How do I replace the Lower Intake Manifold Gasket on my '97 Chevy Lumina 3.1 L?
The Chevy 3.1 L engine as well as the Chevy 3.4 L engine that use Dex Cool Anti-freeze are known for lower intake manifold gasket leaks. Pressure testing the coolant system can usually confirm if your lower intake manifold is leaking or not. If it leaking, you will want to replace it right away to prevent further damage. There are complete instruction below for replacing the lower intake manifold gasket on your 3.1 L engine.
Lower Intake Manifold
To Remove:
- Disconnect the negative battery cable.
- Remove the upper intake manifold.
- Remove the rocker arm covers.
- Disconnect the connector from the ECT sensor.
- Disconnect and remove the fuel injector and MAP sensor wiring harness.
- Remove the fuel pipe clip.
- Remove the fuel injector rail.
- Remove the power steering pump.
- Disconnect the coolant pipe from the lower intake manifold.
- Disconnect the radiator hose from the engine.
- Disconnect the thermostat bypass hose from the pipe and lower intake manifold pipe.
- Remove the lower intake manifold bolts and the lower intake manifold.
- Remove the rocker arms and push rods.
- Remove the lower intake manifold gaskets and seals.
- Clean the sealing surfaces on the cylinder heads and the engine block.
- Remove the engine coolant temperature sensor.
- Remove the water outlet and thermostat if necessary.
To Install:
- Install the thermostat and water outlet if removed.
- Tighten the bolts to 18 lb ft (25 Nm).
- Install the engine coolant temperature sensor.
- Tighten the sensor to 17 lb ft (23 Nm).
NOTE: Make sure the gasket and seal surfaces are clean.
- Install the lower intake manifold gaskets. With gaskets in place, apply a small drop of silicone sealer GM P/N 12346141 (Canadian P/N 10953433) or equivalent to the 4 corners of the intake manifold to block joint.
- Connect the 2 small drops with a bead of RTV sealer that is between 0.31-0.39 in (8-10 mm) wide and 0.12-0.20 in (3.0-5.0 mm) thick.
- Install the push rods and rocker arms.
- Carefully install the lower intake manifold.
- All lower intake manifold bolts should be cleaned, free of any foreign material, and reused only if new bolts are unavailable. Use GM P/N 1234382 (Canadian P/N 10953489) or equivalent and apply to the old intake manifold bolt threads.
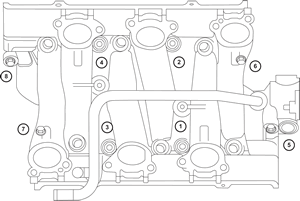
Lower intake manifold bolt installation 
CAUTION
Manufacturer recommends the center bolts be fully torqued before the diagonal bolts to assure proper sealing. The lower intake manifold bolts in location 6 and 7 should be torqued to specification using a crows foot type tool. - Tighten all of the bolts in the sequence shown to 62 lb in (7 Nm) on the first pass.
- Tighten bolts 1, 2, 3 & 4 in sequence to 115 lb in (13 Nm) on the final pass.
- Tighten bolts 5, 6, 7 & 8 in sequence to 18 lb in (25 Nm) on the final pass.
- Connect the thermostat bypass hose to the pipe and the lower intake manifold pipe.
- Connect the radiator hose to the engine.
- Connect the heater pipe and hose to the lower intake manifold.
- Install the power steering pump.
- Install the fuel rail assembly.
- Install the fuel injectors into the lower intake manifold injector bores.
- Press on the injector rail using the palms of both hands until the injectors are fully seated.
- Install the injector bolts.
- Tighten the bolts to 89 lb in (10 Nm).
- Connect the fuel lines to the fuel rail.
- Install the fuel pipe clip bolt.
- Connect the fuel injector and Manifold Air Pressure (MAP) wiring harness.
- Connect the Engine Coolant Temperature (ECT) wiring harness.
- Install the rocker arm covers.
- Install the upper intake manifold.
- Connect the negative battery cable.